AirTAC Solenoid Valve Maintenance Checklist – Troubleshooting Guide
Jun 30 2026AirTAC solenoid valves ensure stable and precise operation of pneumatic systems. Regular maintenance and cleaning prevent vibration, air leaks, and extend the valve’s lifespan.

AirTAC solenoid valves are crucial components in industrial pneumatic systems, ensuring accurate valve actuation, cylinder operation, and automation control. Over time, solenoid valves may develop issues such as vibration, rattling, or air leakage. Proper maintenance and cleaning are essential to maintain performance, extend valve lifespan, and reduce maintenance costs.
Common Causes of Solenoid Valve Issues
- Unstable Air Pressure – Fluctuating compressed air can cause valves to vibrate or make rattling noises.
- Dirt or Contamination – Dust, metal shavings, or other debris can accumulate on the valve spool, filter, or coil, reducing smooth operation.
- Incorrect Installation – Valves not firmly mounted to the manifold or sub-base, or using hoses that are too soft, can lead to instability.
- Weak or Overheated Coil – Faulty or improperly powered coils may prevent the valve from switching correctly, causing vibration or rattling sounds.
- Incorrect Flow Rate (Cv) – Using a valve that is too small or too large for the cylinder can result in poor response and vibration.
AirTAC Solenoid Valve Maintenance Checklist
1. Check Pressure and Flow
- Use AirTAC AR/BR Series regulators to stabilize pressure.
- Ensure sufficient airflow for both the valve and the cylinder.
2. Clean Spool, Coil, and Filter
- Remove the valve from the manifold or sub-base.
- Clean the spool, coil, and filter mesh using clean compressed air or a soft cloth.
- Image reference: Use the general overview from the 4V/3V catalog showing valve, coil, and spool.
3. Inspect Installation
- Ensure the valve is securely mounted on the manifold or sub-base.
- Check air inlet/outlet ports to ensure no blockages.
4. Inspect the Coil
- Verify AC/DC voltage matches the valve specifications.
- Replace coil if it is burned, overheated, or has broken wires.
- Confirm IP65 protection is intact to prevent dust and water ingress.
5. Check Seals, Fittings, and Accessories
- Replace worn gaskets or O-rings.
- Inspect manifold base, quick connectors, and Y-joints to ensure smooth operation.
6. Test Manual Override
- Press the manual override button to ensure the valve switches accurately, with a response time ≤0.05 seconds.
7. Perform Test Operation
- Reinstall the valve and run the system at standard pressure and flow.
- Check if the valve vibrates, rattles, or leaks air.
Maintenance Tips
- Never operate the valve beyond its specified pressure and flow range.
- Clean valves periodically to prevent dust and metal particles from accumulating.
- Always inspect coils and electrical connections before operation.
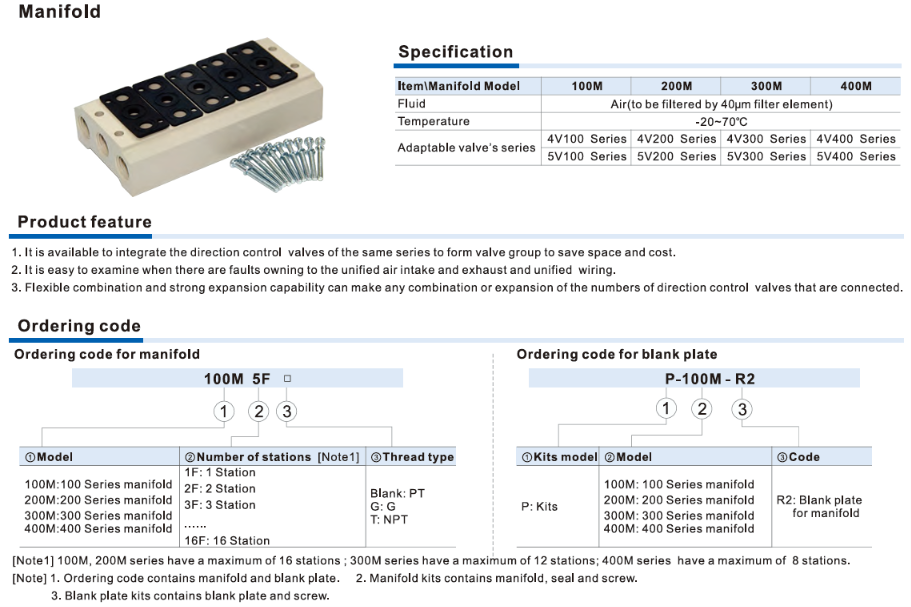
- When combining multiple valves, use AirTAC standard manifolds to reduce vibration and maintain sealing.
- Record the valve model used: 4V100, 4V200, 4V300, 3V100, 3V200, 3V300 for accurate maintenance.
Quick Maintenance Summary
- Check air pressure and flow.
- Clean spool, coil, and filter mesh.
- Inspect installation on manifold or sub-base.
- Check coil and electrical connections.
- Replace worn gaskets or fittings.
- Test manual override.
- Run system test – check for vibration, rattling, or air leaks.
Related Post
")
How to Select AirTAC Solenoid Valves from A-Z (With Technical Guidance)

AirTAC Pneumatic Combo Solution – Valve + Cylinder + Air Filter

Where to Buy Genuine AirTAC Pneumatic Valves – Trusted Suppliers

Latest AirTAC Solenoid Valve Price List – 2026 Update

AirTAC Solenoid Valve Accessories – Quick Connects, Silencers, and Sub-Bases

Top-Selling AirTAC 4V Series Solenoid Valve Models in 2026

AirTAC Solenoid Valve Catalog – Full Guide to Download and Use the PDF

Complete AirTAC Solenoid Valve Specification Table – Your Ultimate Guide

Solenoid Valve Vibration and Noise – Quick Troubleshooting Guide for Pneumatic Systems

AirTAC Solenoid Valve Weak or Insufficient Flow – Causes and Solutions